JdbcTemplate
01-JdbcTemplate
2021-08-20 193 0
简介 JdbcTemplate封装JDBC,实现数据库的操作。

1. 如何使用JdbcTemplate
1、什么是 JdbcTemplate
(1) Spring 框架对 JDBC 进行封装,使用 JdbcTemplate 方便实现对数据库操作
2. 引入jar包
mysql-connector-java-5.1.7-bin.jar
spring-jdbc-5.2.6.RELEASE.jar
spring-tx-5.2.6.RELEASE.jar
3. 配置数据库连接池
4. 创建JdbcTemplate对象
<!-- 配置数据库 -->
<bean id="dataSource" class="com.alibaba.druid.pool.DruidDataSource"
destroy-method="close">
<property name="url" value="jdbc:mysql://localhost:3306/spring5db" />
<property name="username" value="root" />
<property name="password" value="123456" />
<property name="driverClassName" value="com.mysql.jdbc.Driver" />
</bean>
<!--配置jdbcTemplate对象,并注入属性-->
<bean id="jdbcTemplate" class="org.springframework.jdbc.core.JdbcTemplate">
<property name="dattaSource" ref="dataSource"></property>
</bean>
5.创建Service 和 Dao类
@Service
public class OrderService {
@Autowired
private OrderDao orderDao;
}
@Repository
public interface OrderDao {
public void userUpdate();
}
@Repository
public class OrderDaoImpl implements OrderDao{
@Autowired
private JdbcTemplate jdbcTemplate;
@Override
public void userUpdate() {
}
}
2. 实现数据库的操作
1. 创建数据库
create database if not exists spring5db default character set = 'utf8';
2. 创建表
create table t_order(
order_id int primary key auto_increment,
order_name varchar(20),
order_status varchar(2)
);
insert into t_order values(1, 'computer', '1');
INSERT INTO t_order VALUES(2, 'phone', '0');
3. 创建实体类
public class Order {
private int orderId;
private String orderName;
private String orderStatus;
public Order...
}
4. 完成service 和Dao
@Service
public class OrderService {
@Autowired
private OrderDao orderDao;
public void orderUpdate(Order order){
orderDao.orderUpdate(order);
}
}
@Repository
public interface OrderDao {
public void orderUpdate(Order order);
}
@Repository
public class OrderDaoImpl implements OrderDao{
@Autowired
private JdbcTemplate jdbcTemplate;
@Override
public void orderUpdate(Order order) {
String sql = "insert into t_order values(?, ?, ?);";
jdbcTemplate.update(sql, order.getOrderId(), order.getOrderName(), order.getOrderStatus());
}
}
5. 测试类
public class TestOrderService {
@Test
public void test1(){
System.out.println("# test1 method called ...");
ClassPathXmlApplicationContext context = new ClassPathXmlApplicationContext("jdbctemp.xml");
OrderService orderService = context.getBean("orderService", OrderService.class);
orderService.orderUpdate(new Order(3, "book", "2"));
}
}

3. 查询操作
3.1 查询记录数量queryForObject
public int selectCount() {
String sql = "select count(1) from t_order;";
Integer count = jdbcTemplate.queryForObject(sql, Integer.class);
return count;
}
3.2 查询返回对象queryForObject
public Order showdetails(Integer id) {
String sql = "select * from t_order where order_id = ?;";
Order order = jdbcTemplate.queryForObject(sql, new BeanPropertyRowMapper<Order>(Order.class), id);
return order;
}
3.3 查询返回List集合query
@Override
public List<Order> showall() {
String sql = "select * from t_order;";
List<Order> query = jdbcTemplate.query(sql, new BeanPropertyRowMapper<Order>(Order.class));
return query;
}
4. 批量操作
4.1 批量添加
@Override
public int[] addAll(List<Object[]> orders) {
String sql = "insert into t_order values(?,?,?)";
int[] ints = jdbcTemplate.batchUpdate(sql, orders);
return ints;
}
测试类
@Test
public void test5(){
System.out.println("# test5 method called ...");
ClassPathXmlApplicationContext context = new ClassPathXmlApplicationContext("jdbctemp.xml");
OrderService orderService = context.getBean("orderService", OrderService.class);
List<Object[]> list = new LinkedList<>();
Object[] o1 = {11, "order11", "1"};
Object[] o2 = {22, "order22", "2"};
Object[] o3 = {33, "order33", "0"};
list.add(o1);
list.add(o2);
list.add(o3);
int[] ints = orderService.addAll(list);
System.out.println(Arrays.toString(ints));
}
4.2 批量添加与修改、删除类似。
5. 事务
1、什么事务
( 1)事务是数据库操作最基本单元,逻辑上一组操作,要么都成功,如果有一个失败所有操作都失败
(2)典型场景:银行转账
2、事务四个特性(ACID)
(1)原子性
(2)一致性
(3)隔离性
(4)持久性
6. Spring 事务的操作
1、事务添加到 JavaEE 三层结构里面 Service 层(业务逻辑层)
2、在 Spring 进行事务管理操作
(1)有两种方式:
编程式事务管理: 代码写事务的开始和结束,使得代码比较臃肿
声明式事务管理(使用)
3、声明式事务管理
(1)基于注解方式(使用)
(2)基于 xml 配置文件方式
4、在 Spring 进行声明式事务管理,底层使用 AOP 原理
5、 Spring 事务管理 API
(1)提供一个接口,代表事务管理器,这个接口针对不同的框架提供不同的实现类
7. 声明式事务管理
1、在 spring 配置文件配置事务管理器
<!-- 创建事务管理器 -->
<bean id="transactionManager" class="org.springframework.jdbc.datasource.DataSourceTransactionManager">
<property name="dataSource"></property>
</bean>
2、 在 spring 配置文件,开启事务注解
(1)在 spring 配置文件引入名称空间 tx
<?xml version="1.0" encoding="UTF-8"?>
<beans xmlns="http://www.springframework.org/schema/beans"
xmlns:xsi="http://www.w3.org/2001/XMLSchema-instance"
xmlns:context="http://www.springframework.org/schema/context"
xmlns:tx="http://www.springframework.org/schema/tx"
xmlns:aop="http://www.springframework.org/schema/aop"
xsi:schemaLocation="http://www.springframework.org/schema/beans http://www.springframework.org/schema/beans/spring-beans.xsd
http://www.springframework.org/schema/context http://www.springframework.org/schema/context/spring-context.xsd
http://www.springframework.org/schema/aop http://www.springframework.org/schema/aop/spring-aop.xsd
http://www.springframework.org/schema/tx http://www.springframework.org/schema/tx/spring-tx.xsd">
(2)开启事务注解
<!-- 开启事务注解 -->
<tx:annotation-driven transaction-manager="transactionManager"></tx:annotation-driven>
3、在 service 类上面( 或者 service 类里面方法上面)添加事务注解
(1) @Transactional,这个注解添加到类上面,也可以添加方法上面
(2)如果把这个注解添加类上面,这个类里面所有的方法都添加事务
(3)如果把这个注解添加方法上面,为这个方法添加事务
@Transactional
public int[] addAll(List<Object[]> orders){
return orderDao.addAll(orders);
}
8.Transactional的相关参数介绍
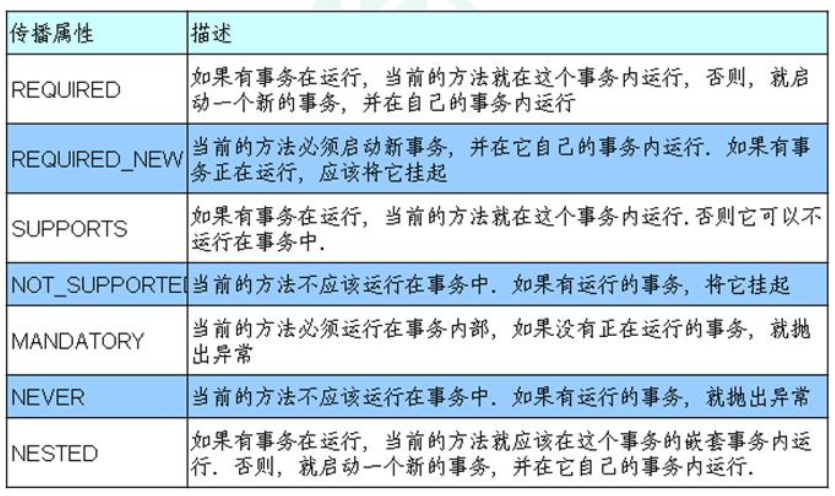
1、 propagation:事务传播行为
( 1)多事务方法直接进行调用,这个过程中事务 是如何进行管理的
在类或者方法之上添加
@Transactional(propagation = Propagation.REQUIRED)

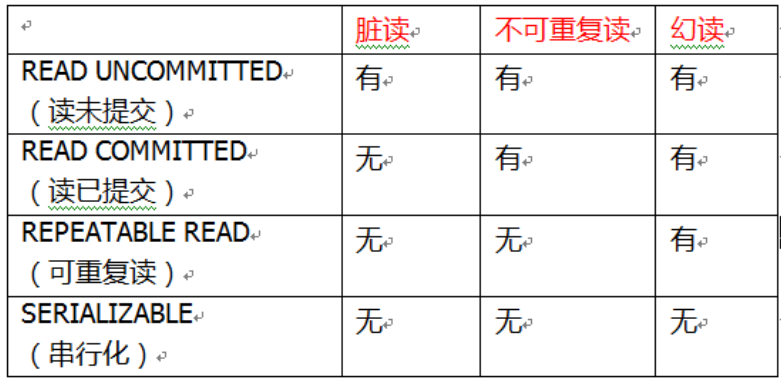
9. 隔离级别
@Transactional(propagation = Propagation.REQUIRED, isolation = Isolation.REPEATABLE_READ)

10. 超时时间
(1)事务需要在一定时间内进行提交,如果不提交进行回滚
(2)默认值是 -1 ,设置时间以秒单位进行计算
@Transactional(propagation = Propagation.REQUIRED, isolation = Isolation.REPEATABLE_READ, timeout = -1)
11.是否只读
(1)读:查询操作,写:添加修改删除操作
(2) readOnly 默认值 false,表示可以查询,可以添加修改删除操作
(3)设置 readOnly 值是 true,设置成 true 之后,只能查询
12. 是否回滚
rollbackFor:回滚
(1)设置出现哪些异常进行事务回滚
noRollbackFor:不回滚
(1)设置出现哪些异常不进行事务回滚
13. 基于xml配置
<?xml version="1.0" encoding="UTF-8"?>
<beans xmlns="http://www.springframework.org/schema/beans"
xmlns:xsi="http://www.w3.org/2001/XMLSchema-instance"
xmlns:context="http://www.springframework.org/schema/context"
xmlns:aop="http://www.springframework.org/schema/aop"
xmlns:tx="http://www.springframework.org/schema/tx"
xsi:schemaLocation="http://www.springframework.org/schema/beans http://www.springframework.org/schema/beans/spring-beans.xsd
http://www.springframework.org/schema/context http://www.springframework.org/schema/context/spring-context.xsd
http://www.springframework.org/schema/aop http://www.springframework.org/schema/aop/spring-aop.xsd
http://www.springframework.org/schema/tx http://www.springframework.org/schema/tx/spring-tx.xsd">
<!-- 组件扫描 -->
<context:component-scan base-package="com.ylaihui"></context:component-scan>
<!-- 数据库连接池 -->
<bean id="dataSource" class="com.alibaba.druid.pool.DruidDataSource"
destroy-method="close">
<property name="url" value="jdbc:mysql://localhost:3306/db_name" />
<property name="username" value="root" />
<property name="password" value="123456" />
<property name="driverClassName" value="com.mysql.jdbc.Driver" />
</bean>
<!-- JdbcTemplate对象 -->
<bean id="jdbcTemplate" class="org.springframework.jdbc.core.JdbcTemplate">
<!--注入dataSource-->
<property name="dataSource" ref="dataSource"></property>
</bean>
<!--1 创建事务管理器-->
<bean id="transactionManager" class="org.springframework.jdbc.datasource.DataSourceTransactionManager">
<!--注入数据源-->
<property name="dataSource" ref="dataSource"></property>
</bean>
<!--2 配置通知-->
<tx:advice id="txadvice">
<!--配置事务参数-->
<tx:attributes>
<!--指定哪种规则的方法上面添加事务-->
<tx:method name="accountMoney" propagation="REQUIRED"/>
<!--<tx:method name="account*"/>-->
</tx:attributes>
</tx:advice>
<!--3 配置切入点和切面-->
<aop:config>
<!--配置切入点-->
<aop:pointcut id="pt" expression="execution(* com.ylaihui.*(..))"/>
<!--配置切面-->
<aop:advisor advice-ref="txadvice" pointcut-ref="pt"/>
</aop:config>
</beans>
14. 完全注解开发
1. 创建配置类
//TransactionConfig.java
@Configuration // 声明为Spring的配置类,代替XML配置文件
@ComponentScan(basePackages = "com.ylaihui") // 开启组件扫描,扫描包下带有注解的类或方法
@EnableTransactionManagement // 开启事务管理
public class TransactionConfig {
//德鲁伊连接池对象创建
@Bean
public DruidDataSource getDruidDataSource(){
DruidDataSource druidDataSource = new DruidDataSource();
druidDataSource.setDriverClassName("com.mysql.jdbc.Driver");
druidDataSource.setUrl("jdbc:mysql://localhost:3306/spring5db");
druidDataSource.setUsername("root");
druidDataSource.setPassword("123456");
return druidDataSource;
}
// 创建 JdbcTemplate 对象
@Bean
public JdbcTemplate getJdbcTemplate(DruidDataSource druidDataSource){
JdbcTemplate jdbcTemplate = new JdbcTemplate(druidDataSource);
return jdbcTemplate;
}
// 创建事务管理器
@Bean
public DataSourceTransactionManager getDataSourceTransactionManager(DruidDataSource druidDataSource) {
DataSourceTransactionManager transactionManager = new DataSourceTransactionManager();
transactionManager.setDataSource(druidDataSource);
return transactionManager;
}
}
2. 创建表和 entity
create table t_money (
id int,
money double
);
INSERT INTO t_money VALUES(1, 1000);
INSERT INTO t_money VALUES(2, 1000);
3. 创建Dao接口和类
@Repository
public class MoneyDaoImpl implements MoneyDao{
@Autowired
private JdbcTemplate jdbcTemplate;
@Override
public int reduceMoney() {
String sql = "update t_money set amount = amount - 100 where id = '1';";
int update = jdbcTemplate.update(sql);
return update;
}
@Override
public int addMoney() {
String sql = "update t_money set amount = amount + 100 where id = '2';";
int update = jdbcTemplate.update(sql);
return update;
}
}
5. 创建 service 类和测试类
注意 在Service 类中控制事务的处理
@Service
@Transactional(readOnly = false,timeout = -1,propagation = Propagation.REQUIRED,isolation = Isolation.REPEATABLE_READ)
public class MoneyService {
@Autowired
private MoneyDao moneyDao;
public int addMoney() {
return moneyDao.addMoney();
}
public int reduceMoney(){
return moneyDao.reduceMoney();
}
public void processMoney(){
int i1 = addMoney();
// 事务中模拟异常
int i = 1 / 0;
int i2 = reduceMoney();
}
}


